Windows 11 has a built-in feature that allows you to control the mouse pointer using your keyboard. This can be useful if you have difficulty using a mouse or if your mouse is not working properly.
How to enable Mouse Keys feature using Settings
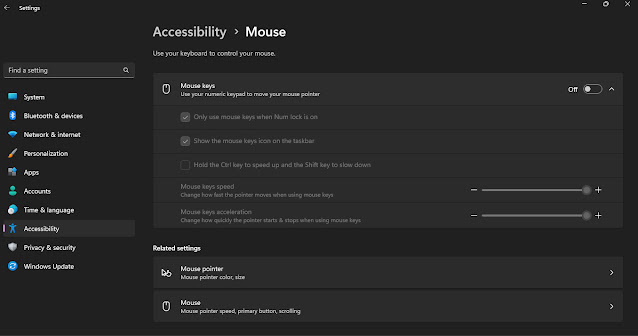
To control the mouse pointer using the keyboard on Windows 10, use these steps:
- Open Settings.
- Click on Accessibility.
- Click on Mouse.
- Turn on the Mouse Keys toggle switch.
- (Optional) Check the Hold Ctrl key + to speed up and the Shift key to slow down option.
- Use the sliders to adjust the pointer speed and pointer acceleration.
Once you complete the steps, you can use the numeric keypad on the keyboard to move the mouse around the screen. Usually, you'll use the 4 and 6 keys to move left and right, and the 2 and 8 keys to move up and down.
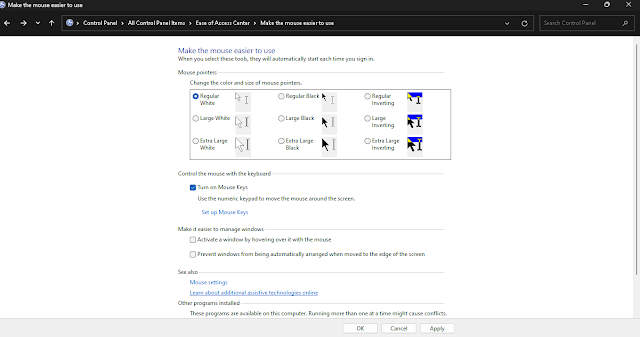
Here are the steps to control the mouse pointer with the keyboard on Windows 11:
- Press the Windows key on your keyboard to open the Start menu.
- Type "Control Panel" and select it from the search results.
- In the Control Panel, click on "Ease of Access."
- Click on "Ease of Access Center."
- Scroll down and click on "Make the mouse easier to use."
- Under "Control the mouse with the keyboard," select the checkbox that says "Turn on Mouse Keys."
- Click "Apply" and then "OK."
- Once Mouse Keys is turned on, you can use the numeric keypad on your keyboard to control the mouse pointer. The keys are mapped as follows:
- 8: Move the pointer up
- 2: Move the pointer down
- 4: Move the pointer left
- 6: Move the pointer right
- 5: Click the mouse
- +: Double-click the mouse
- /: Click and drag
9. To adjust the speed of the pointer, click on "Set up Mouse Keys" and adjust the sliders for "Pointer speed" and "Acceleration."
That's it! You can now control the mouse pointer with your keyboard on Windows 11.


